


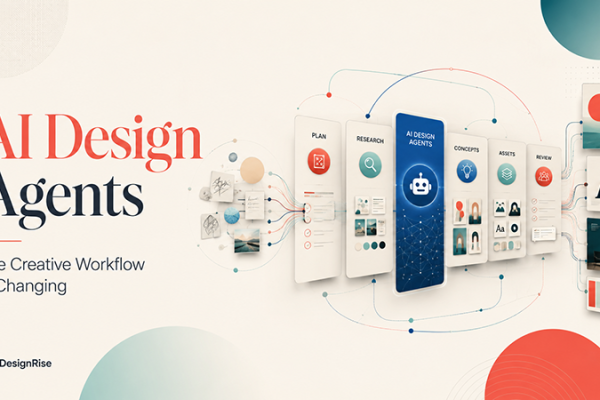

An AI video workflow is not a sequence of prompts. It is a production system designed to keep ideas, characters, environments, camera language, motion, sound, and editing coherent from the first frame to the final export.
That distinction matters because generating a single impressive clip is now relatively easy. Building a complete video that feels as if every shot belongs to the same project is much harder.
A character changes face between scenes. A jacket shifts color. The lighting jumps from warm sunset to cold studio light. The camera suddenly switches from restrained cinematic movement to exaggerated floating motion. A background loses architectural details. A product shape drifts. A five-second shot looks beautiful on its own but breaks the visual language of the sequence around it.
The result is technically generated video, but it does not feel directed.
At DesignRise, we approach AI video differently: lock the visual language before you generate the motion. The model should not decide the identity of the project shot by shot. The creative system should already exist before the animation stage begins.
The DesignRise principle:
Consistency is not something you repair at the end. It is something you design into the workflow from the beginning.
Why AI Video Consistency Is Harder Than Generating a Good Clip
Traditional video production starts with continuity. The same actor, wardrobe, set, camera package, lighting plan, props, art direction, and production design remain available across multiple shots. Even when scenes change, the production team deliberately controls what changes and what stays constant.
AI video reverses that relationship.
Every new generation is an opportunity for the system to reinterpret the scene. The model may preserve the broad concept while changing smaller details that matter to the viewer’s sense of continuity.
That is why the real challenge is not simply generation quality. It is decision consistency across generations.
Consistency has several layers
- Subject consistency: the same person, object, creature, or product must remain recognizable.
- Wardrobe consistency: clothing, accessories, textures, patterns, and colors should not drift without reason.
- Environment consistency: architecture, furniture, landscape, weather, signage, props, and spatial relationships should remain coherent.
- Style consistency: contrast, palette, grain, realism, illustration style, lens character, and lighting should belong to one visual world.
- Camera consistency: lens feel, framing, movement, depth of field, and camera energy should match the intended visual language.
- Motion consistency: the way people walk, fabric moves, products rotate, or the camera travels should feel intentional.
- Temporal consistency: details should remain stable within a single shot rather than changing from frame to frame.
- Narrative consistency: the viewer should understand where the action is going and why one shot follows another.
- Audio consistency: voice, music, ambience, pacing, and sound design should reinforce the same emotional direction.
A strong workflow handles these layers separately instead of expecting one long prompt to solve everything at once.
The DesignRise AI Video Consistency Framework
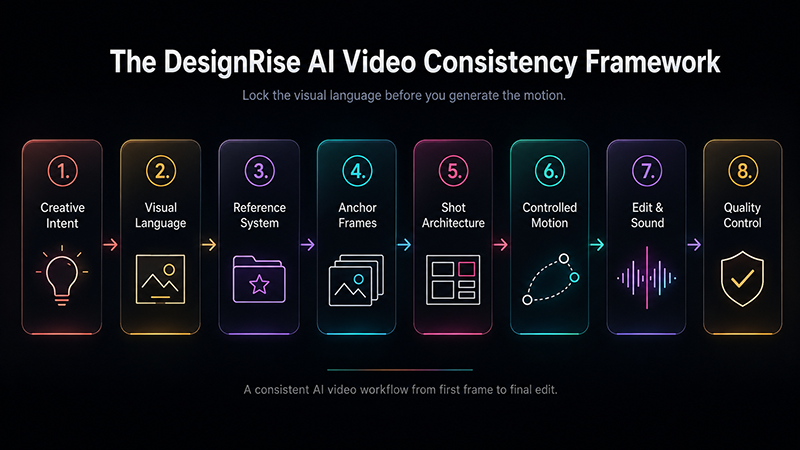
The DesignRise AI Video Consistency Framework organizes production into eight connected stages:
- Creative Intent — define the message, audience, duration, format, and emotional target.
- Visual Language — lock palette, lighting, lens feel, texture, composition, and style.
- Reference System — create reliable references for characters, products, environments, and wardrobe.
- Anchor Frames — establish the visual truth of key scenes before motion generation.
- Shot Architecture — plan sequence, camera logic, transitions, and continuity before generating clips.
- Controlled Motion — animate shot by shot while changing as few variables as possible.
- Edit & Sound — build rhythm, hide weak joins, strengthen meaning, and unify the sequence.
- Quality Control — review visual drift, continuity, pacing, audio, and export quality before release.
Creative Intent → Visual Language → Reference System → Anchor Frames → Shot Architecture → Controlled Motion → Edit & Sound → Quality Control
The order is deliberate. The earlier a creative decision is locked, the fewer variables the video model has to invent later.
Step 1: Define the Deliverable Before Choosing the AI Tool
The first mistake in many AI video projects happens before the first prompt: the creator opens a generator without defining the actual deliverable.
“Make a cinematic AI video” is not a production brief.
A useful brief answers questions such as:
- Is this a 15-second social ad, a 60-second brand film, a music visual, a title sequence, a product teaser, or a narrative short?
- Is the video vertical, square, or widescreen?
- Will it include dialogue, voiceover, captions, music, or only sound design?
- Does the viewer need to recognize one recurring character?
- Is there a real product whose shape must remain accurate?
- Will the sequence use realistic cinematography, stylized animation, mixed media, or graphic motion?
- How many shots are actually needed?
- Which moments carry the message, and which are only transitions?
Write a one-sentence creative contract
“Create a 30-second premium fashion film with one recurring female character, a restrained black-and-burgundy palette, slow deliberate camera movement, soft directional lighting, and six connected shots that move from isolation to confidence.”
That sentence becomes a filter. If a generated shot is impressive but breaks the contract, it does not belong in the final video.
Step 2: Lock the Visual Language Before Generating Motion
This is the highest-leverage stage in the entire workflow.
Visual consistency improves when the team decides what the project should look like before asking the model to animate it.
Create a small visual bible
Your visual bible does not need to be a 40-page brand guide. For a short AI video, one page can be enough.
- Color palette: dominant, secondary, and accent colors.
- Lighting: soft daylight, hard sun, neon night, warm practicals, overcast softness, studio contrast, etc.
- Contrast: soft and low-contrast, deep blacks, lifted shadows, high-key, or dramatic.
- Lens language: intimate close-up, wide environmental perspective, compressed portrait feel, macro detail, or clean commercial framing.
- Depth of field: shallow, moderate, or mostly sharp.
- Texture: polished digital, film grain, analog softness, glossy advertising, tactile documentary, or illustrative.
- Camera behavior: static, slow push, controlled handheld, orbit, tracking, crane-like movement, or intentionally mixed.
- Motion energy: calm, elegant, nervous, fast, surreal, weightless, mechanical, or organic.
Define what the project should never become
| Keep | Avoid |
|---|---|
| Restrained camera movement | Fast floating camera or random zooms |
| Soft directional light | Flat beauty lighting |
| Muted burgundy and black | Unexpected bright cyan, lime, or candy colors |
| Natural body motion | Exaggerated dance-like movement |
| Premium editorial realism | Plastic skin or game-render aesthetics |
The point is not to control every pixel. It is to reduce the number of creative decisions the model is allowed to reinvent.
Step 3: Build a Reference System Instead of Rewriting Prompts
A long prompt is not a substitute for a reference system.
If the same character, product, environment, or wardrobe element appears in multiple shots, save consistent visual references before motion generation begins.
Your reference pack may include:
- front, three-quarter, and profile character views;
- close-up face reference;
- full-body wardrobe reference;
- product reference from several angles;
- environment wide shot;
- material and texture close-ups;
- lighting reference;
- color palette;
- camera/framing examples;
- a reference frame for each major location.
Keep references clean. If one image is meant to establish the character’s face, do not also ask it to explain complex environment design, wardrobe variants, and unusual lighting.
Create a simple continuity sheet
| Continuity Area | Locked Detail | Can Change? |
|---|---|---|
| Character | Face, hair length, age range | Expression and pose |
| Wardrobe | Black structured coat, silver earrings | Natural folds |
| Environment | Dark concrete corridor, red practical light | Camera position |
| Camera | Slow, controlled, cinematic | Push, track, static |
This turns continuity into something you can check instead of something you hope the model remembers.
Step 4: Create Anchor Frames Before You Animate
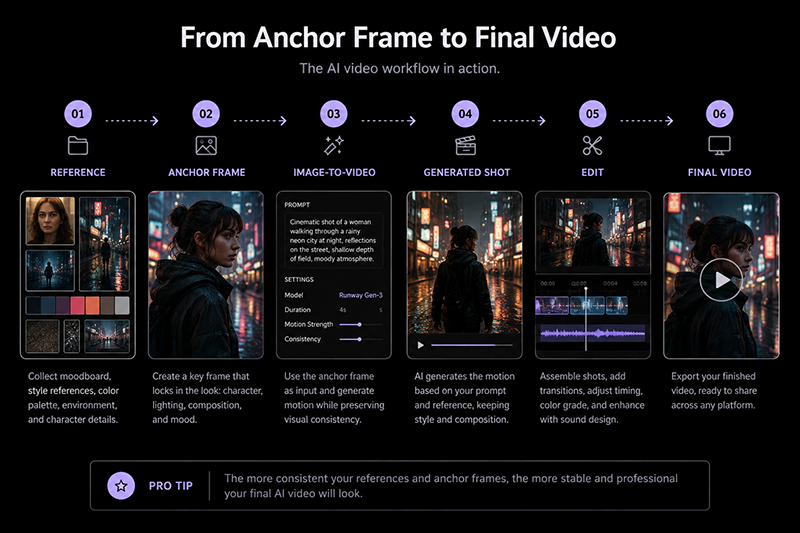
One of the strongest ways to improve an AI video production workflow is to separate image design from motion design.
Do not start by generating twenty moving clips and then try to make them look related.
First create the strongest still frame for each important shot. These become your anchor frames.
An anchor frame should solve:
- subject identity;
- wardrobe;
- environment;
- composition;
- lighting;
- color;
- camera angle;
- visual hierarchy;
- important product details.
Only after the frame works as a still should you ask the video model to introduce motion.
DesignRise workflow rule: If you would not approve the frame as a campaign still, do not animate it.
When composition and identity are already established, the motion prompt can focus on fewer variables: What should move? How fast? In which direction? What should remain stable?
Step 5: Plan Shot Architecture Before Generating the Sequence
AI video becomes expensive and inconsistent when every shot is treated as a separate creative experiment.
Before animation, write a simple shot list.
| Shot | Purpose | Framing | Motion | Continuity Link |
|---|---|---|---|---|
| 01 | Establish location | Wide | Slow push | Red light source on frame right |
| 02 | Introduce character | Medium | Subtle track | Same corridor and wardrobe |
| 03 | Emotional detail | Close-up | Almost static | Match eyeline from shot 02 |
| 04 | Reveal action | Medium wide | Controlled follow | Continue walking direction |
Give each shot one job
A common AI video mistake is asking every shot to do too much. A single clip does not need to reveal the environment, introduce the hero, show the product, perform a dramatic camera orbit, create an emotional beat, and transition into the next scene.
Simpler shot intention usually produces stronger footage.
Step 6: Design the Relationship Between the First Frame and the Last Frame
When the workflow supports first-frame or end-frame control, think about a shot as a transition between two visual states.
The first frame tells the model where the shot begins. The last frame can help define where it should arrive.
Think in edit points
- What should the viewer see at the beginning?
- What should be different at the end?
- Which element should remain unchanged?
- Where will the editor cut?
- Does the next shot continue direction, eyeline, movement, shape, or color?
This produces footage for an edit rather than footage that merely looks interesting in isolation.
Step 7: Write Motion Prompts Around Change, Not Description
If the anchor image already contains the character, wardrobe, environment, and art direction, repeating a long visual description can introduce unnecessary reinterpretation.
For motion, focus on what changes over time.
A useful motion prompt can define:
- subject action;
- camera movement;
- motion speed;
- environmental movement;
- physical behavior;
- what should remain stable;
- how the shot should end.
Motion direction: The woman walks slowly toward camera while maintaining eye contact. The camera makes a restrained backward tracking movement at matching speed. Her coat moves naturally with each step. Keep facial identity, earrings, coat structure, corridor geometry, and red practical light stable. No sudden camera rotation, no new objects, no wardrobe change.
This is not a universal prompt formula. Different tools interpret instructions differently. The principle is to separate scene identity from motion behavior.
Step 8: Treat Character Consistency as an Asset Problem
If a person appears across multiple shots, stop thinking of them as “the woman in the prompt.” Treat them as a production asset.
Lock character identity
- face shape;
- hair color and length;
- skin tone;
- distinctive features;
- age range;
- body proportions when relevant;
- wardrobe;
- jewelry or accessories.
Changing pose is normal. Changing identity is not.
If the model repeatedly drifts, simplify the problem. Return to a strong reference image, reduce the number of simultaneous changes, or rebuild the shot from a stable still instead of continuing from a weak generation.
Watch small identity failures
- eye shape changes;
- hairline moves;
- jaw becomes narrower;
- age shifts;
- makeup changes;
- earrings disappear;
- wardrobe details mutate.
These small changes accumulate. By shot six, the viewer may feel that something is wrong even if they cannot explain why.
Step 9: Build Environments Like Sets
Environments should be treated as reusable sets rather than vague descriptions.
If the character returns to the same room, corridor, street, office, or landscape, define the persistent features.
Environment continuity may include:
- door and window positions;
- light sources;
- dominant materials;
- furniture placement;
- signage;
- weather;
- time of day;
- background color;
- spatial direction;
- hero props.
When a new camera angle is needed, reinterpret the same set rather than generating a new location from scratch.
Step 10: Give the Camera a Personality
Camera inconsistency can make a sequence feel more fragmented than small image defects.
Decide how the camera behaves in this project.
Premium editorial: restrained pushes, precise lateral tracks, locked-off details, slow intentional movement.
Documentary energy: subtle handheld movement, imperfect framing, responsive camera behavior.
Surreal dream sequence: impossible transitions, floating movement, spatial transformation.
All three can work. The problem appears when the video moves randomly between them.
Control camera energy across the timeline
Not every shot should contain the strongest camera move. Think musically: quiet → build → peak → release.
A static close-up can feel more cinematic after several moving shots because the contrast gives it meaning.
Step 11: Protect Motion Continuity Between Shots
The edit becomes smoother when shots share movement logic.
- Direction: subject exits frame right and continues moving right in the next shot.
- Eyeline: a character looks toward something that appears in the following shot.
- Shape: a circular object cuts to another circular composition.
- Color: a red light becomes the red object in the next shot.
- Motion: a downward hand movement cuts to a downward camera move.
- Speed: calm motion remains calm instead of jumping to frantic movement.
- Position: the main subject occupies a similar area of frame across a cut.
These are editorial decisions, not AI features. They are also one of the easiest ways to make generated footage feel directed.
Step 12: Generate Variations With a Reason
More generations do not automatically create a better film.
Generate variations to answer a specific question:
- Which motion speed feels natural?
- Which camera direction supports the edit?
- Which version preserves identity best?
- Which ending frame connects to the next shot?
- Which version keeps product details stable?
Do not create twenty versions because you are unsure what the shot should be. Creative uncertainty should be solved in the brief, storyboard, or anchor frame first.
Step 13: Use Production Naming Instead of a Downloads Folder
AI video projects become chaotic quickly because each approved clip may have many rejected siblings.
AI_VIDEO_PROJECT/
│
├── 01_BRIEF/
├── 02_REFERENCES/
│   ├── CHARACTER/
│   ├── WARDROBE/
│   ├── ENVIRONMENT/
│   └── STYLE/
├── 03_ANCHOR_FRAMES/
├── 04_GENERATIONS/
│   ├── SHOT_01/
│   ├── SHOT_02/
│   └── SHOT_03/
├── 05_APPROVED/
├── 06_AUDIO/
├── 07_EDIT/
└── 08_EXPORT/
S03_v01_slow_push.mp4
S03_v02_static.mp4
S03_v03_track_left_APPROVED.mp4
Production discipline sounds boring until you need to rebuild a sequence two weeks later.
Step 14: Edit Before You Generate Every Final Shot
Do not wait until every clip is “finished” before opening the timeline.
Create a rough edit early. Temporary stills, animatics, rough AI clips, placeholders, and text cards can establish:
- duration;
- shot order;
- rhythm;
- where the message lands;
- which shots are unnecessary;
- where the sequence needs breathing room;
- which transitions need special planning.
The edit should drive generation
If the timeline only needs 2.4 seconds of a shot, do not spend hours perfecting a long clip that will never be used.
If two shots do not connect, redesign the second shot’s opening rather than trying to hide the problem with another random transition.
Generate → Place in timeline → Evaluate continuity → Adjust → Regenerate only what the edit needs.
Step 15: Use Transitions to Connect Meaning, Not Hide Weak Shots
AI makes spectacular transitions easy to overuse.
Morphs, portals, liquefying surfaces, impossible camera moves, and object transformations can be visually impressive, but they should serve the project.
Often, a clean cut is stronger.
Use a transition when it:
- connects two visual ideas;
- preserves a movement direction;
- communicates transformation;
- moves the story into another time or location;
- supports the music or narrative beat;
- is part of the project’s established language.
Do not use a complex transition only because two clips do not match. Fixing the underlying continuity usually produces a more professional result.
Step 16: Build Sound as Early as Possible
Video consistency is not only visual.
Sound can unify footage generated from different models, days, styles, and sources.
Even a short AI video can benefit from separate audio layers:
- music;
- voiceover;
- dialogue;
- room tone or ambience;
- footsteps;
- cloth movement;
- mechanical or environmental sounds;
- transition effects;
- impact accents.
Sound gives generated motion weight
A visually convincing door can still feel weightless until the edit includes the sound of the handle, hinge, room ambience, and closing impact.
A fashion shot may feel more expensive when subtle fabric movement, footsteps, and spatial ambience support the image instead of relying only on music.
Step 17: Use the Final Edit to Unify the AI Footage
The final edit is where individual generations become one piece.
This stage can correct small differences without pretending that major continuity failures are acceptable.
Useful unifying adjustments include:
- consistent crop and aspect ratio;
- color correction;
- contrast matching;
- grain or texture treatment;
- speed adjustments;
- careful stabilization where necessary;
- sound bridges;
- matching exposure;
- consistent typography;
- controlled sharpening or denoising;
- subtle reframing.
Color grading can unify two compatible shots. It cannot turn two different characters into the same person.
The edit should polish continuity, not manufacture it from broken source material.
The DesignRise AI Video Consistency Scorecard
Before final export, score each sequence rather than evaluating only the most impressive shot.
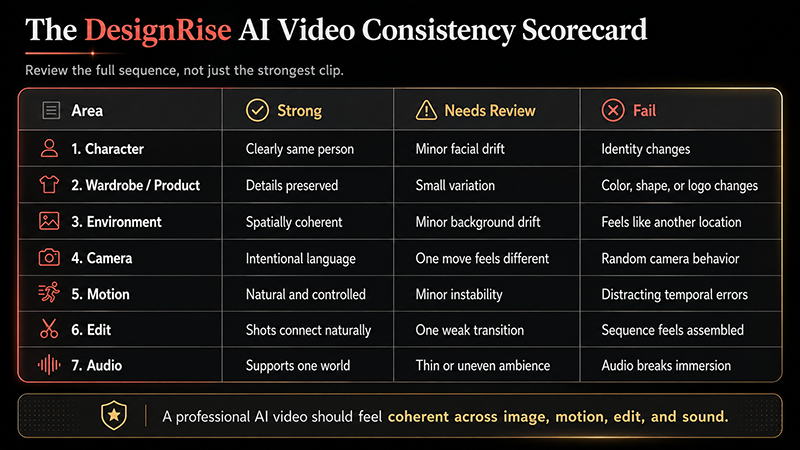
| Area | Strong | Needs Review | Fail |
|---|---|---|---|
| Character | Clearly same person | Minor facial drift | Identity changes |
| Wardrobe / Product | Details preserved | Small variation | Color, shape, logo, or construction changes |
| Environment | Spatially coherent | Minor background drift | Feels like another location |
| Camera | Intentional language | One move feels different | Random camera behavior |
| Motion | Natural and controlled | Minor instability | Distracting temporal errors |
| Edit | Shots connect naturally | One weak transition | Sequence feels assembled, not directed |
| Audio | Supports one world | Thin or inconsistent ambience | Audio breaks immersion |
Common AI Video Workflow Failures — and How to Fix Them
Failure 1: Every shot looks good, but the video feels wrong
Cause: each shot was art-directed independently.
Fix: return to the visual bible. Identify which variables changed—palette, lens feel, lighting, camera energy, environment, or character identity—and rebuild the weakest shots from shared references.
Failure 2: The character changes between shots
Cause: identity is described verbally but not locked with consistent references.
Fix: create stronger character assets, use approved anchor frames, reduce simultaneous scene changes, and regenerate from the stable identity rather than from the drifting output.
Failure 3: Motion looks artificial even when the still frame is excellent
Cause: too much motion, conflicting movement, or unclear physical direction.
Fix: simplify. Ask for one primary subject action and one primary camera behavior. Keep everything else stable.
Failure 4: Product details mutate
Cause: the model is allowed to reinterpret commercially important visual information.
Fix: create product references, identify “do not change” details, keep product motion controlled, and reject visually impressive generations that alter the product.
Failure 5: The edit relies on flashy transitions
Cause: shots were not designed to connect.
Fix: use match direction, eyeline, color, framing, or motion continuity. A clean cut between well-designed shots is usually stronger than a transition that hides mismatch.
Failure 6: The project generates endlessly
Cause: there is no approval criterion.
Fix: define what makes a shot “good enough” before generating variants. Stop when the shot meets the creative contract and continuity requirements.
A Practical 30-Second AI Video Workflow
1. Brief
Define message, format, duration, audience, and emotional arc.
2. Visual Bible
Lock black, burgundy, and warm skin tones; soft directional light; controlled camera; premium editorial realism; subtle film texture.
3. Character Pack
Create approved face, profile, full-body, and wardrobe references.
4. Environment Pack
Create a master wide view of the corridor and a few detail references.
5. Six Anchor Frames
Design all six shots as still images. Place them next to each other and check whether they already feel like one campaign.
6. Rough Timeline
Place stills into a 30-second sequence. Add temporary music and voiceover. Adjust durations before motion generation.
7. Generate Shot 01
Use a slow push. Review identity, environment, and lighting.
8. Generate Shot 02
Use the same character and location references. Continue the movement direction established in shot 01.
9. Continue One Shot at a Time
Do not regenerate the visual identity with each scene. Reuse the system.
10. Edit Approved Versions
Check whether the ending of one shot naturally connects to the opening of the next.
11. Add Sound Design
Build footsteps, cloth movement, corridor ambience, transitions, music, and voice.
12. Final Consistency Pass
Review the complete video without stopping. The question is no longer “Is every clip impressive?” It is “Does this feel like one directed piece?”
Choose AI Video Tools by Role, Not Hype
A strong AI video workflow does not require one platform to do everything.
- concept development;
- reference-image generation;
- image editing;
- video generation;
- lip sync;
- voice;
- music;
- cleanup;
- upscaling;
- editing;
- motion graphics;
- color finishing.
The important question is not “Which AI video tool is best?” It is:
Which role does this tool perform reliably inside my production system?
If you need a broader comparison of generation platforms, see Best Tools for 2026: Create Content Without Filming. For a wider motion-design toolkit, explore Top AI Tools for Motion Designers & Video Creators.
The DesignRise AI Video Workflow Checklist
- ☐ The project has a clear deliverable, duration, format, and message.
- ☐ The visual language is defined before animation begins.
- ☐ Character, product, wardrobe, and environment references are saved.
- ☐ Important shots have approved anchor frames.
- ☐ The full sequence has a shot list or rough storyboard.
- ☐ Each shot has one primary purpose.
- ☐ Camera behavior follows a consistent visual language.
- ☐ Motion prompts focus on change rather than redesigning the scene.
- ☐ Character identity remains stable across shots.
- ☐ Wardrobe and product details remain stable.
- ☐ Environment geometry and lighting remain coherent.
- ☐ Motion direction and eyelines support the edit.
- ☐ A rough timeline exists before every shot is finalized.
- ☐ Transitions serve the story rather than hide mismatches.
- ☐ Sound design supports the same world as the visuals.
- ☐ Generated assets are clearly named and organized.
- ☐ Final color and texture treatment is consistent.
- ☐ The complete film passes a continuity review from beginning to end.
What Makes an AI Video Feel Professional?
Professional AI video is not defined by how impossible the images are.
It is defined by control.
The audience should feel that someone made decisions about what to show, what not to show, where the camera goes, when the camera stays still, which details repeat, which details change, when a cut happens, when the sequence becomes quiet, how sound supports movement, and how the final image serves the idea.
AI can generate more visual possibilities than a traditional production could realistically shoot. That abundance makes direction more important, not less.
The creator’s job changes from producing every pixel manually to building a system in which the right pixels keep being selected.
The Goal Is Not More Generation. It Is More Control.
AI video tools will continue to improve. Clips will become longer, cleaner, more controllable, and easier to generate.
But better generation does not remove the need for a workflow. It increases it.
The more capable the model becomes, the more creative choices it can make on your behalf. Without a strong visual system, those choices can pull the project in different directions.
At DesignRise, we see consistency as the bridge between experimentation and production.
A good prompt can create a good clip.
A good workflow can create a film.
The DesignRise takeaway:
Lock the visual language before you generate the motion. Build references before variations. Edit before everything is final. And judge the sequence, not the individual clip.
Frequently Asked Questions
What is an AI video workflow?
An AI video workflow is the complete production process used to move from concept and references to AI-generated shots, editing, sound, quality control, and final export. A strong workflow controls visual identity, continuity, motion, camera language, and file organization instead of treating each generation as an isolated clip.
How do you keep AI videos consistent?
Start by locking a visual language, building reusable references, creating anchor frames, planning the shot sequence, and changing as few variables as possible during motion generation. Character, wardrobe, environment, camera, lighting, and color should all have continuity rules.
Should I use text-to-video or image-to-video for consistent AI video?
Both can be useful, but image-to-video is often especially valuable when the exact appearance of the starting frame matters. A strong anchor image can establish character, wardrobe, composition, environment, and lighting before motion is introduced. The best approach depends on the creative goal and the capabilities of the tool being used.
Why does my AI character change between shots?
Character drift usually happens when identity is being recreated rather than reused. Build a stronger character reference pack, keep wardrobe and styling stable, use approved anchor frames, and reduce the number of simultaneous changes requested in each generation.
How many shots should an AI video have?
There is no ideal universal number. Use only the shots needed to communicate the idea at the required duration. A short video with six intentional shots is usually stronger than a sequence of fifteen clips included only because they were successfully generated.
When should editing begin in an AI video project?
Editing should begin early. Build a rough timeline with still frames, placeholders, or draft clips before every shot is finalized. This helps determine timing, shot order, transitions, and which generations are actually worth refining.
Do I need one AI tool for the entire video workflow?
No. A production can use different tools for concepting, images, video generation, voice, music, cleanup, upscaling, editing, and motion graphics. The workflow should choose tools by role rather than forcing one platform to handle every stage.
Explore More DesignRise Resources
- Best Tools for 2026: Create Content Without Filming — compare AI video generation platforms for different content needs.
- Top AI Tools for Motion Designers & Video Creators — explore AI tools for motion, video, sound, enhancement, and production.
- DesignRise — discover more AI workflows, creative technology guides, design resources, and practical systems for modern creators.
Discover more from DesignRise
Subscribe to get the latest posts sent to your email.