

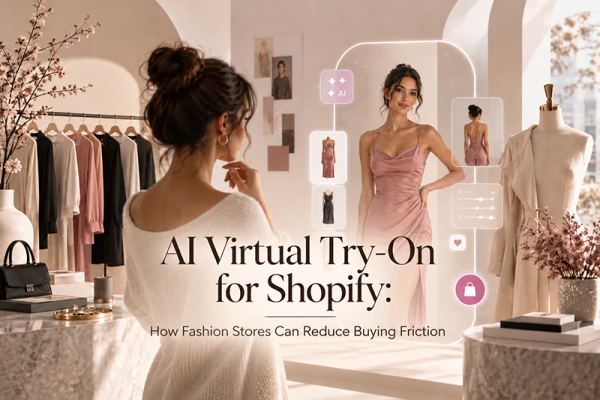



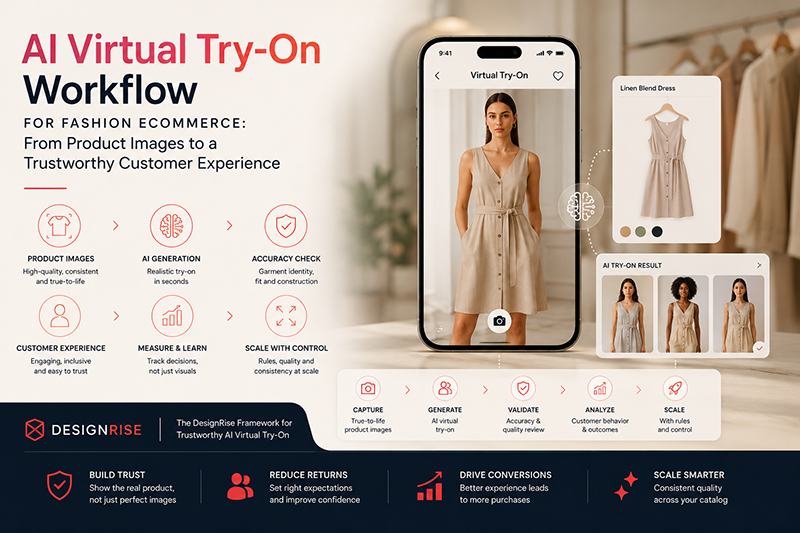
An AI virtual try-on workflow should do more than produce a convincing image. In fashion ecommerce, the real job is harder: preserve the product, make the experience understandable, protect customer trust, and create a process that still works when the catalog grows from a handful of garments to hundreds or thousands of SKUs.
That is where many virtual try-on projects become complicated. A demo can look impressive with one clean product image and one carefully selected model. A live store has inconsistent photography, new seasonal drops, difficult fabrics, multiple colorways, customer selfies taken in bad lighting, mobile users on slow connections, and products that simply do not generate well.
The biggest mistake is to start with the AI model instead of the merchandise.
A reliable implementation starts with a source-of-truth system for the product, then adds generation, quality control, customer experience, measurement, and only finally scale. The result is not simply an AI feature. It is an ecommerce production workflow.
At DesignRise, we treat virtual try-on as a controlled visual system rather than a standalone AI effect. The technology matters, but the workflow around it matters more: what the model receives, what the team reviews, what the shopper understands, and what the business measures after launch.
Last updated: August 2026
This guide has been refreshed to strengthen the implementation workflow, internal DesignRise resource links, ecommerce trust guidance, and practical review steps for fashion teams evaluating AI virtual try-on.
How to Use This AI Virtual Try-On Workflow Guide
This guide is designed for ecommerce teams that already understand what virtual try-on can do and now need a reliable way to implement it without weakening product accuracy or customer trust.
If you are still comparing vendors, start with our AI virtual try-on platforms comparison. If your broader goal is to improve product discovery, personalization, recommendations, pricing, and retention across an online store, see our guide to AI eCommerce tools for online stores. For product-image preparation before generation, use the AI product photography workflow.
The workflow below is best used as an implementation checklist: define the business goal, prepare source assets, decide eligible products, test quality, protect privacy, measure outcomes, and scale only when the system proves that it can preserve product truth.
The workflow in one line:
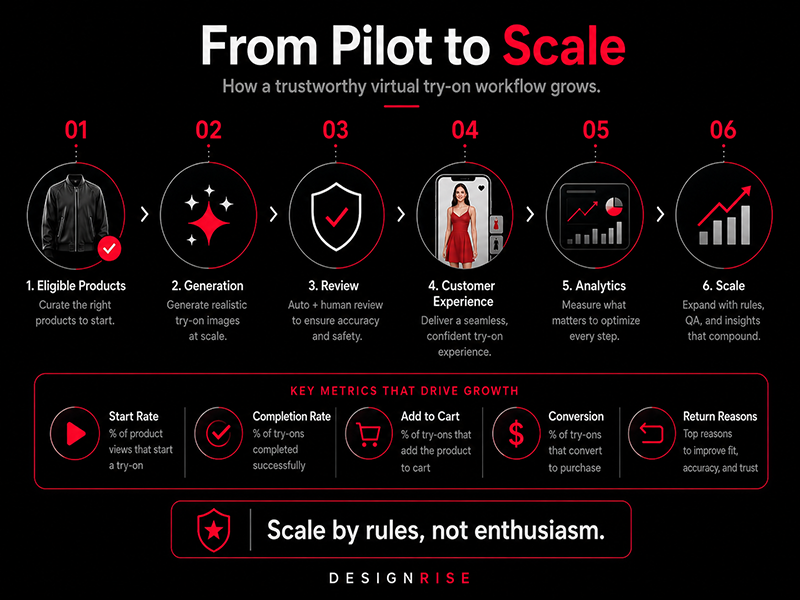
Product truth → source preparation → try-on generation → accuracy review → customer experience → analytics → controlled scale
Why Virtual Try-On Needs a Workflow, Not Just a Tool
Virtual try-on has moved beyond novelty. Google has integrated AI-powered clothing try-on into its shopping experience, allowing shoppers to create a digital version of themselves and visualize apparel from product listings. That matters because it changes the expectation around product discovery: shoppers increasingly encounter AI visualization as part of the buying journey, not only as a special feature on experimental fashion sites.
But an ecommerce team has a different responsibility from a consumer AI demo. A shopper is not simply generating an image for entertainment. They are using that image to evaluate a real product that they may pay for.
That changes the standard.
For ecommerce, a beautiful render is not enough. The generated image needs to remain connected to the product that will arrive in the parcel. If a tool changes the neckline, invents a pocket, shortens the hem, removes a belt, simplifies a print, or turns matte fabric into satin, the result may still be photorealistic while becoming commercially misleading.
This is why the best workflow separates two questions that are often treated as one:
- Does the image look believable?
- Does the image still represent the product accurately?
A trustworthy system has to answer yes to both.
Related DesignRise guide:
For the wider context of AI-generated product visuals, read How AI Is Changing Ecommerce Photography, which explains the trust problem behind scalable product imagery.
Before choosing technology, it helps to understand the market. Our comparison of AI virtual try-on platforms for fashion ecommerce looks at different approaches, including Shopify apps, enterprise APIs, generative apparel systems, AR platforms, and retail experiences. The workflow in this article begins after that selection process: it focuses on how to turn a platform into a dependable ecommerce operation.
The DesignRise AI Virtual Try-On Framework: 7 Layers
The DesignRise AI Virtual Try-On Framework treats virtual try-on as seven connected layers rather than one generation step. The purpose is simple: keep product truth intact while making the experience scalable enough for real ecommerce operations.
Virtual try-on should also be connected to the rest of the commerce stack. Product discovery, recommendations, customer journeys, product photography, and merchandising all affect how useful the feature becomes. A strong try-on workflow works best when it supports a larger ecommerce strategy rather than living as an isolated visual effect.
A mature virtual try-on system can be understood as seven connected layers:
- Business goal: define what the try-on experience is supposed to improve.
- Product truth: create reliable source assets for each eligible SKU.
- Input preparation: standardize garment and shopper/model images.
- Generation: route the right products through the right try-on method.
- Accuracy control: review whether the product survived generation.
- Customer experience: present the result without overstating what it proves.
- Measurement and scale: expand only when quality and business signals justify it.
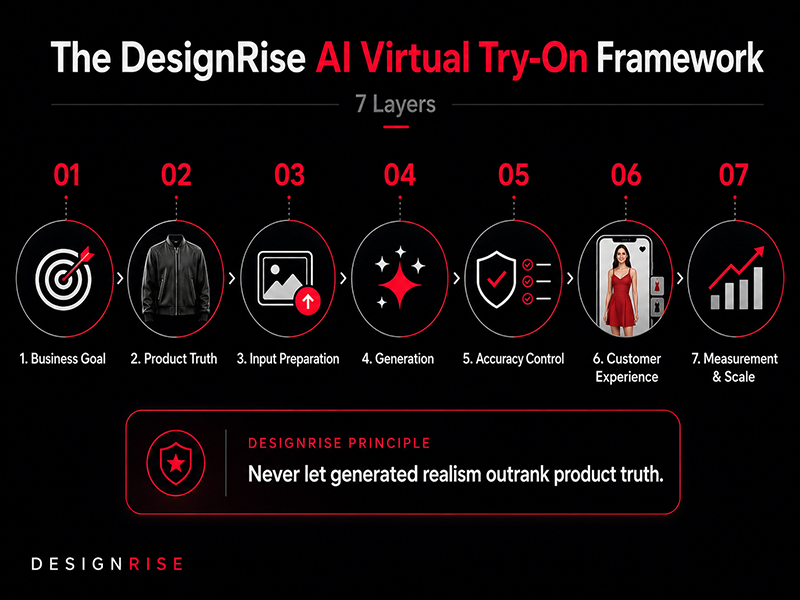
Each layer solves a different failure mode. Skipping one usually moves the problem downstream, where it becomes more expensive to fix.
The DesignRise rule:
Never let generated realism outrank product truth. If an AI image looks more polished than the source but represents the garment less accurately, the workflow has failed.
Step 1: Define the Job Before Choosing the Experience
“We want virtual try-on” is not yet a useful brief.
A fashion store may actually be trying to solve one of several different problems:
- help shoppers imagine a style on themselves;
- reduce uncertainty around color or silhouette;
- make outfit discovery more interactive;
- increase engagement on product pages;
- help customers compare garments;
- create more inclusive model representation;
- generate additional on-model content;
- support a high-consideration category such as bridal, luxury accessories, or occasionwear;
- create an in-store or campaign experience rather than an online fitting room.
These goals should not be treated as interchangeable.
A shopper-facing fitting room needs consent, upload UX, processing feedback, fallback states, and a clean return path to the product page. A brand-side content workflow needs asset management, art direction, batch generation, and an approval system. An AR experience for a watch or shoe needs different input assets and different quality tests from generative apparel try-on.
Create one primary success statement
Before implementation, write a sentence that can be tested.
“We want shoppers on eligible dress product pages to visualize the garment on themselves before choosing whether to add it to the cart.”
That is better than “increase engagement,” because it defines the user, the page, the product category, and the moment in the journey.
Step 2: Build a Product Truth Layer
The most important asset in a virtual try-on system is not the generated image. It is the reference image that tells the team what must not change.
For each eligible SKU, create a small source pack that functions as the product truth layer.
A useful product source pack can include:
- a clean front product image;
- a back or secondary angle where construction matters;
- a close-up of prints, logos, embroidery, hardware, or texture;
- the correct color name and product variant;
- a short note on details the AI must preserve;
- the actual product dimensions or garment specifications where available;
- a list of included accessories such as belts, detachable straps, or matching pieces.
This does not mean every virtual try-on platform will accept all of these files. The point is operational: the generation team and reviewers should have a reliable reference beside the AI output.
Create a “do not change” field
| Product | Critical details | Risk level |
|---|---|---|
| Logo sweatshirt | Logo spelling, logo position, ribbed cuffs, hem length | High |
| Plain knit top | Neckline shape, sleeve length, knit texture | Medium |
| Asymmetric dress | One-shoulder construction, hem shape, waist seam | High |
This small step changes review from “does it look good?” to “did it preserve the specific facts that matter?”
Start with the strongest product photography you already have
AI does not remove the need for good source assets. Poor segmentation, heavy shadows, severe perspective, hidden garment edges, inaccurate color, or low-resolution images make the pipeline harder before generation even begins.
As one useful benchmark, Google’s merchant guidance for its apparel try-on experience recommends high-resolution images and says the image should contain only the listed garment. Google recommends at least 512 × 512 pixels, ideally 1024 pixels or higher, for that particular try-on system. Your chosen platform may have different requirements, so its own documentation should remain the final technical reference.
For a more complete product-image preparation process, see our AI Product Photography Workflow: From Raw Product Photo to Marketplace-Ready Image.
Implementation note: If the source product image is weak, the try-on result can still look polished while becoming less truthful. Product-image preparation is not a cosmetic step; it is the foundation of the entire workflow.
Step 3: Decide Which Products Are Eligible for Virtual Try-On
One of the best ways to improve a virtual try-on workflow is surprisingly simple: do not send every SKU through it.
Some products are naturally easier to visualize. Others are fragile from an accuracy perspective.
Lower-risk candidates
- plain tops;
- simple dresses;
- basic trousers;
- solid colors;
- garments with clear silhouettes;
- items photographed cleanly from the front.
Higher-risk candidates
- small or repeating typography;
- precise branded logos;
- complex plaid, stripes, or directional patterns;
- transparent and semi-transparent fabrics;
- lace and fine mesh;
- sequins and highly reflective materials;
- asymmetric construction;
- multiple layered pieces sold as one look;
- garments with detachable parts;
- unusual draping or sculptural volume.
This is not a permanent blacklist. It is an eligibility strategy. Once the system performs reliably on simpler products, more difficult categories can be introduced intentionally.
Step 4: Standardize the Inputs Before Generation
A scalable AI workflow should reduce unnecessary variation before it asks the model to solve anything.
For product images, standardize:
- orientation;
- crop;
- background treatment;
- resolution;
- variant naming;
- file naming;
- which image is considered the primary garment reference.
For model or shopper images, define what your system handles well. Depending on the platform, that may include guidance around full-body versus upper-body framing, neutral poses, visibility of arms and legs, lighting, occlusion, background complexity, and camera angle.
Do not invent one universal photo rule for all platforms. Test your chosen system and turn its real success patterns into a short, visual upload guide for customers.
Make the upload instructions visible before the upload
A frustrating pattern in AI products is asking the user for a photo first and explaining the requirements only after the system fails.
Reverse that.
Show a simple “best results” example beside the upload control. Explain the expected framing in one or two sentences. If a full-body image is required, say so before opening the camera roll. If a selfie can be transformed into a full-body representation, explain that clearly.
Step 5: Generate With Guardrails, Not Blind Automation
At this point the product and person inputs enter the try-on system. This is where teams are often tempted to automate everything immediately.
Resist that temptation during the pilot.
Use generation to learn the system’s failure patterns before designing a fully automated pipeline.
Capture more than the final image
For each generation, retain operational metadata such as:
- SKU and color variant;
- source product image;
- generation timestamp;
- platform or model version where available;
- output status;
- review result;
- failure reason if rejected.
You are building a quality dataset about your own catalog.
After enough reviewed outputs, patterns become more useful than anecdotes. You may discover that one category performs reliably while another repeatedly fails on sleeve construction. That information should shape eligibility and automation rules.
Create clear output states
- Pass: product is accurate enough for the intended use.
- Review: result is plausible but a detail needs human verification.
- Fail: product identity or customer representation is materially wrong.
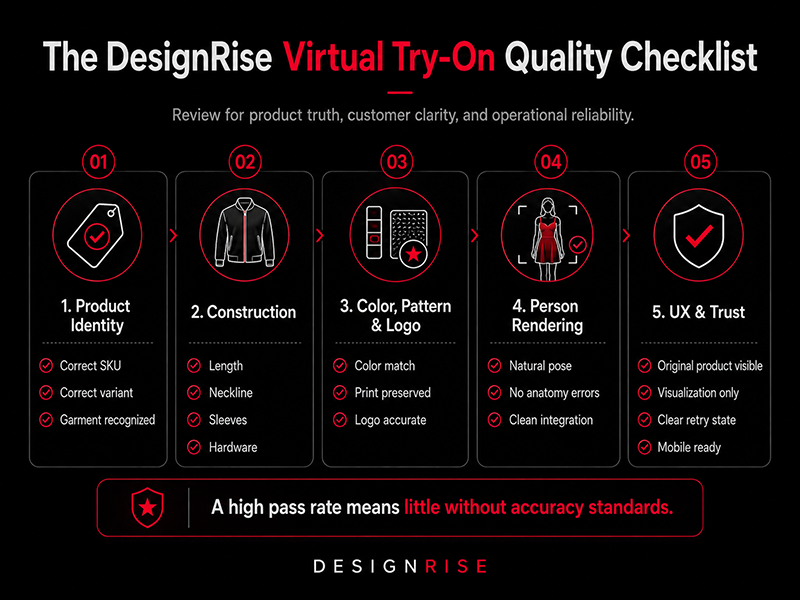
Step 6: Run Two-Stage Quality Control
The strongest review process separates visual quality from commerce accuracy.
Gate A: Does the generated image work visually?
- broken anatomy;
- unnatural hands or limbs;
- garment intersections;
- duplicated fabric;
- missing body areas;
- strange shadows;
- perspective errors;
- obvious generation artifacts;
- poor face or hair integration where relevant.
Gate B: Is the actual product still truthful?
- silhouette;
- length;
- neckline;
- sleeves;
- waistline;
- color;
- pattern;
- logos and text;
- buttons, zips, pockets, and hardware;
- included accessories;
- material appearance;
- asymmetric details;
- number of visible pieces.
A practical accuracy scorecard
| Area | 2 — Pass | 1 — Review | 0 — Fail |
|---|---|---|---|
| Garment identity | Clearly the same product | Minor ambiguity | Looks like a different product |
| Color | Consistent with source | Small shift | Materially different |
| Construction | Key seams and features preserved | Minor detail changed | Feature added, removed, or altered |
| Pattern / logo | Accurate | Needs inspection | Distorted or invented |
| Person rendering | Natural and coherent | Minor artifact | Distracting or broken |
The score itself is less important than consistency. A shared rubric stops reviewers from approving an image simply because it is attractive.
Step 7: Separate “How It Looks” From “How It Fits”
This distinction should be designed into both the workflow and the customer interface.
Generative virtual try-on can help answer:
“How might this style look on a person like me?”
That is not automatically the same as:
“Will this exact size fit my body correctly?”
Physical fit depends on garment measurements, body measurements, fabric stretch, ease, pattern construction, intended silhouette, and personal preference. A generated visual can appear fitted or loose without having enough information to make a sizing promise.
That means the product page should keep size guidance separate unless the system is specifically designed and validated for size recommendation.
Use precise interface language
- “See this style on you”;
- “Visualize this look”;
- “Create a virtual try-on”;
- “Preview the garment on your photo.”
Step 8: Design the Customer Experience Around Trust
A try-on tool can be technically impressive and still make the store harder to use.
The customer should always understand three things:
- what they are being asked to provide;
- what the AI result represents;
- how to continue shopping after generation.
Keep the original product visible
One of the simplest trust mechanisms is to show the original product image alongside or immediately accessible from the generated result.
The AI visualization should not replace the evidence. It should supplement it.
A useful result screen can contain:
- generated try-on image;
- small original product thumbnail;
- selected color and size controls;
- “View original images” action;
- add-to-cart action;
- clear statement that the image is a visualization;
- retry or change-photo option.
Do not trap the shopper inside the feature
After a render, the next step should be obvious. The customer should not have to close several overlays, return to the gallery, and find the selected variant again.
Virtual try-on should shorten uncertainty, not create navigation friction.
Design graceful failure
- ask for a different photo;
- explain what needs to change;
- allow the customer to continue shopping immediately;
- never block normal product-page functionality;
- avoid repeatedly consuming credits or user time without explanation.
Step 9: Treat Customer Photos as a Product Decision, Not Fine Print
When shoppers upload images of themselves, privacy is part of the experience design.
Before launch, the team should know:
- what image data is collected;
- whether images are stored or processed temporarily;
- how long any stored files remain available;
- whether the provider uses uploads for model training;
- where processing occurs;
- how deletion requests are handled;
- whether a shopper can use the store without participating in try-on;
- how minors and sensitive use cases are handled;
- which vendor or subprocessors have access to the data.
These questions should be answered before the feature reaches production. Where regulatory requirements apply, review the implementation with appropriate privacy or legal specialists for the markets in which the store operates.
Ask for the minimum necessary input
If the experience can work with one photograph, do not ask for five. If body measurements are not needed for the visualization, do not collect them merely because they might be useful later.
Step 10: Keep Generated Assets Connected to Commerce Data
If virtual try-on outputs are reused outside the live fitting-room experience—for example in campaign pages, product content, feeds, social creatives, or marketplace assets—the workflow needs an export policy.
Store generated assets with:
- the correct SKU;
- variant identifier;
- source image reference;
- generation date;
- approval status;
- usage rights or platform restrictions where relevant;
- AI-generation metadata where required by the destination platform.
Google Merchant Center, for example, requires AI-generated images submitted to Merchant Center to contain metadata indicating that they were created using generative AI. Teams using generated product imagery in shopping feeds should preserve relevant metadata rather than stripping it during export.
The broader lesson is simple: once an AI image leaves the generation tool, it should not become an anonymous JPG in a downloads folder. It needs provenance.
Step 11: Run a Controlled Pilot Before Catalog-Wide Launch
A pilot should answer two different questions:
- Can the system generate acceptable images?
- Does the experience improve the shopping journey?
A useful early pilot might include a manageable set of products—perhaps 20 to 50 SKUs—across a few difficulty levels rather than the easiest items only. This is not a universal number. The point is to keep the pilot small enough for manual inspection while broad enough to expose real failure modes.
Test the uncomfortable cases
- dark clothing on dark backgrounds;
- light clothing on light backgrounds;
- different skin tones;
- different body proportions;
- long hair covering shoulders;
- cropped or imperfect user photos;
- mobile uploads;
- slow connections;
- multiple product variants;
- generation errors.
The goal is not to prove that the AI works. It is to discover where it does not.
Step 12: Measure Decisions, Not Image Generation
A virtual try-on team can easily celebrate the wrong metric.
Ten thousand generated images sound impressive, but they do not tell you whether the feature helps customers buy with more confidence.
Track the funnel
| Metric | What it tells you |
|---|---|
| Try-on exposure | How many eligible product-page visitors actually see the feature |
| Start rate | Whether the value proposition is compelling enough to begin |
| Completion rate | Whether upload and generation are reliable |
| Time to result | Whether waiting time creates friction |
| Add-to-cart after try-on | Whether visualization is associated with stronger purchase intent |
| Conversion after try-on | Whether users who complete the experience purchase |
| Return reasons | Whether expectations and delivered products remain aligned |
| Repeat usage | Whether customers consider the feature useful enough to use again |
Interpret these metrics carefully. Customers who choose virtual try-on may already be more engaged than average, so a higher conversion rate does not automatically prove causation. Where possible, compare similar cohorts and test changes deliberately.
Track quality metrics too
- percentage of generations that pass review;
- failure rate by product category;
- failure rate by image type;
- average retries per successful output;
- cost per completed try-on;
- most common accuracy failures;
- products excluded from the system.